Encore!!! Language Learning App: Advantages, Features and Benefits
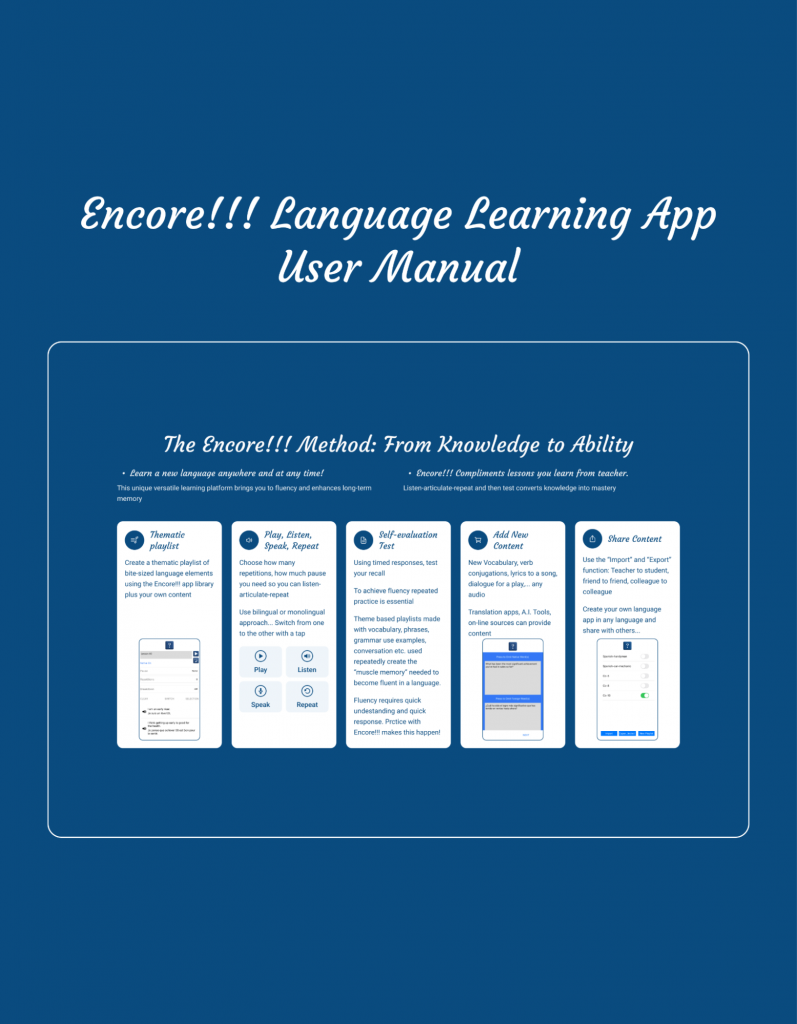
- Knowledge Alone is not Enough to Reach Ability
- Encore!!! Language Learning app: From Knowledge to Ability
- How do I get the Encore!!! Language Learning app?
- What is in the Distributed Library Contents?
- What is a Playlist and what are “bite-sized-elements” that make up a Playlist?
- How do I Prepare and Customize a Playlist? The Free Subscription to the Encore!!! Language Learning app
- How do I Prepare and Customize a Playlist? The Paid subscription to the Encore!!! Language Learning app
- Use Your Playlist: Tap Play and Go! Start Learning!
- Use Your Playlist: Learn and then Self-Evaluate: Take a Test!
- Adding to the Language Library : Custom Content Using MyEntry Feature
- Sharing Content: Playlist Export and Import Functions
- Creating a New Language app using Encore!!! Language app
- Encore!!! Language app to Learn Theatrical Plays, Poetry and Songs
- APPENDIX
Knowledge Alone is not Enough to Reach Ability
The availability of vast online resources has made it very easy for language learning enthusiasts to get access to language knowledge – vocabulary, grammar rules and even well organized lesson plans. More recently the availability of Artificial Intelligence (AI) tools such as ChatGPT have made access to knowledge even easier.
However, the big hurdle to cross after access to knowledge is to develop a grammatical understanding and a long term memory so one can understand and speak a new language in a fluent manner.
There are aspects of challenges faced by language learners that they share with students trying to learn a dance or how to play a musical instrument. Knowing does not lead to mastery. One has to repeatedly use the skill to reach the needed level of ability.
In language learning two of the great frustrations for learners are the difficulty in learning grammar rules and mastering new vocabulary – both in text and in articulation. Students find that they learn new vocabulary or examples of new grammar rules and they think they have learnt the content only to realize after a few days or weeks that they have not absorbed the content deeply enough to use it. This is of course not just the frustration students feel – it is also a source of frustration for teachers. For example, to reach the A2 level (in the European Union system of levels) that represents someone who can carry out most of the basic conversations one encounters in daily life one needs to have a vocabulary of at least 1000 words as well a knowledge of word order and verb conjugation in the past, present and future tenses. It is suggested by most language schools that one can reach this level with 80 hours of classroom instruction. However, this time does not include the time to learn and memorize the needed material. In the classroom a student may get a chance to use the new vocabulary a few times which is barely enough to develop a short term memory that if not reinforced will be lost within a few days or a week. So once can pass an exam if needed but then months down the road one is disappointed that one cannot use the learnt material in a conversation as the memory has faded.
To put new words, verb conjugation rules, phrases etc. in long term memory one needs to use i.e. hear and speak a to be learnt element about 100 times. This is the main reason why an immersion approach where a student may live in an environment where the new language is used and spoken everyday works. This may not be possible for most language learners and this is remedied by Encore!!! Language Learning app. Encore!!! Language Learning app provides the best tools to commit an unfamiliar language entity to long term memory. Here we described how Encore!!! Language Learning app distinguishes itself from all other apps and software tools on the market. Encore!!! acts in a complimentary role to a teacher – with the teacher focussing on crucial language skills and Encore!!! acting to develop long term memory of the topics.
Encore!!! Language Learning app: From Knowledge to Ability
The features and functions that are built into the Encore!!! Language Learning app are guided by the need to overcome the challenges described above and faced by learners to develop long term memory and ability to understand and speak fluently. Below we describe the process of getting the Encore!!! Language Learning app and using and benefiting from its unique features.
How do I get the Encore!!! Language Learning app?
From the Apple or Google app store browse to find: “Encore!!! Language Learning app” and download it on your phone. When the app is downloaded and you tap on the app icon you will see the homepage of the app when you start it for the first time. A “?” button and a “Select’ button. The “?” button takes you to a screen where you can learn about the functioning of the app as well as browse other information documents.
If you tap “SELECT” ⇒ you will go to the language selection screen showing the variety of language choice. Choose the one you wish to learn and tap “Done”. You will be offered the choice to get a “Free” version or a “Paid” version. When you install the version of your choice an appropriate bundle (text + voice) will be downloaded into your app.
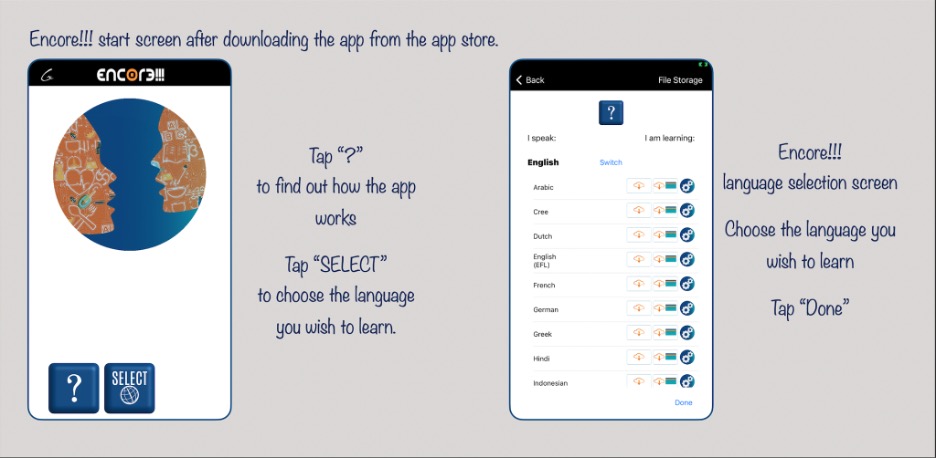
Figure 1: When you download Encore!!! Language Learning app from the app store and open it you will see the image shown on the left. The user has to choose a language that is to be learnt.
Once the language selection is made the home screen will change and will see a new button “START”. If you tap “START” you will get to one of two types of screens: one for the free version and one for the paid version. Both versions have the same distributed library although the free version has only the text content while the paid version has both text and audio.
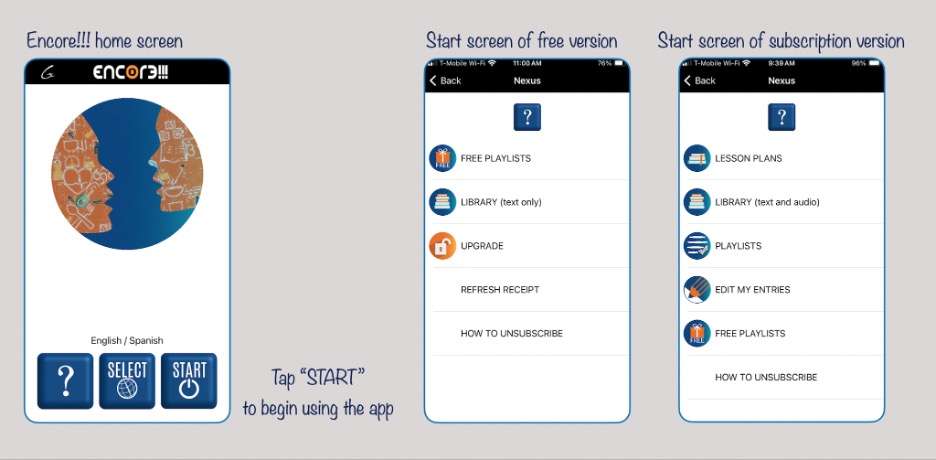
Figure 2: If you choose to download the free version of the app you will be able to peruse some important features of the app. You will be able to have full access to the text of the distributed app as well as be able to try out several “FREE PLAYLISTS”.
What is in the Distributed Library Contents?
The Encore!!! Language Learning app comes with a Library providing a basic level of language content which if learnt allows one to carry out most of the basic conversations one encounters in daily life. The library comes cataloged so a user can study basic vocabulary, grammar rules, word order in sentences and useful conversations. Encore!!! Language Learning app uses a default two language model where a known language (we will call this language KL) is used to learn the new language (NL). One of the language pairs is chosen to be English. So if you choose the Arabic language, for example, the library contents are in English and the corresponding Arabic. The app can be used in a “bilingual” mode or “monolingual” mode (i.e one of the languages in the pair can be switched off).
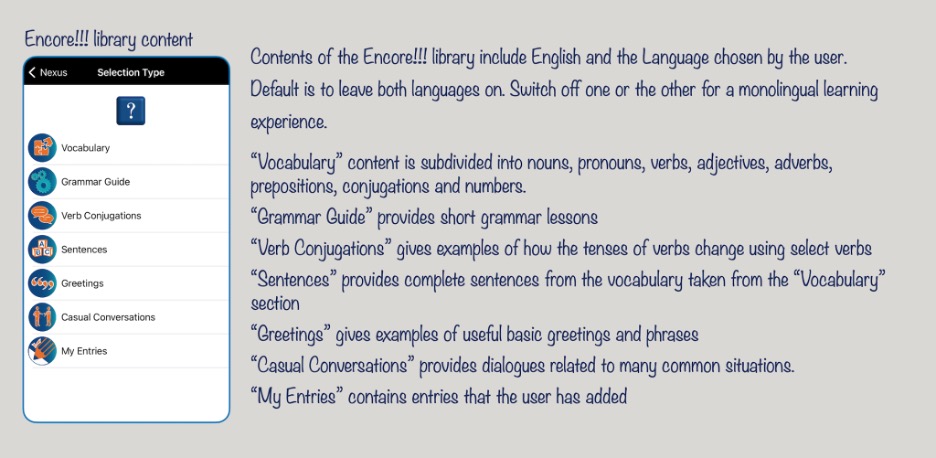
Figure 3: The free version of Encore!!! App and the Paid version of the app have the same distributed library arranged in a cataloged form. The paid version includes audio and text while the free version only contains the text portion. The free version does not enable the “My Entries” functionality of the app.
A user is encouraged to look through the included library. With the free version of the app one can browse the text of the library contents. With a paid version you can see the text and also listen to the library content. The “Library” that is included in the application has its contents organized in “bite-sized elements”.
Later we discuss how the included library can be enhanced through the “MyEntry” feature. With the mY Entries feature a user can add text and voice content that they can create from books or online resources of artificial intelligence apps.
What is a Playlist and what are “bite-sized-elements” that make up a Playlist?
For the purpose of learning a language or any new content such as a song or poem or theatrical play dialog using the Encore!!! Language Learning app, we use a playlist made up of “bite sized-elements”. These elements can be single vocabulary words or a sentence or a verse etc. They may take a few seconds to a few dozen seconds to articulate. The concept that the app uses is that by listening and articulating this “bite sized-element” multiple times we can start to develop the “muscle” memory needed to comprehend and articulate the element. A playlist could have just a few such elements or dozens of such elements. The “bite sized-elements” in the distributed library of the app take anywhere from 1 second (for vocabulary words) to at most 10 seconds (sentences) to articulate. However, when users prepare these “bite sized-elements” they can choose “bite sized-elements” that can be as long or as short as they wish.
When one starts a playlist by tapping the “Play” button on the app the user can go about doing other activities while listening and learning – one can do a workout in the gym, a walk in a park, or do some cooking or cleaning etc.
How do I Prepare and Customize a Playlist? The Free Subscription to the Encore!!! Language Learning app
As noted above, one can get a free version of the app or a paid version. Let us examine how one uses playlists in these versions.
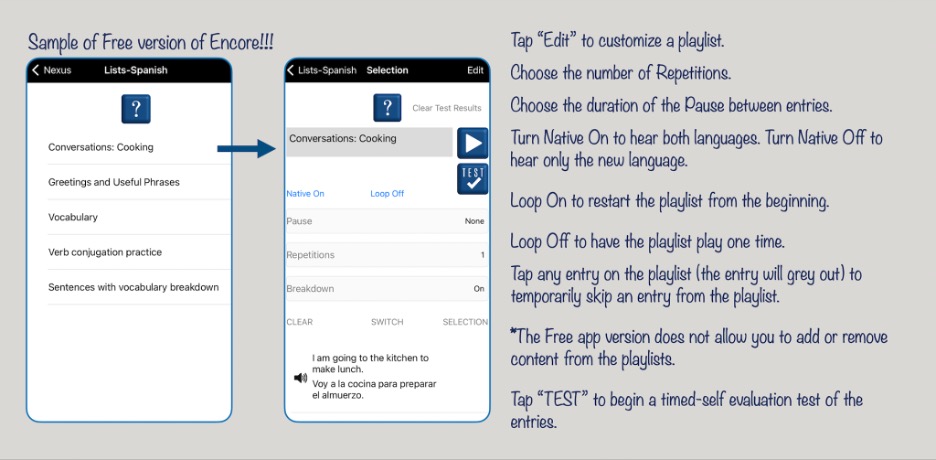
Figure 4: The free version of Encore!!! allows the user access to several playlists containing useful elements of a language they have chosen. The user can choose to customize the repetition number, the pause, whether to use the app in a bilingual mode or monolingual mode. The user can also take a test on the material that has been learnt. The Free version does not allow a user to make new playlists from the distributed library.
Free Subscription to the Encore!!! Language Learning app: With the free version you will have access to a number of “FREE PLAYLISTS”.
Tap FREE PLAYLISTS ⇒ Tap “Playlist Name” (e.g. Conversations: Cooking or Vocabulary etc.) ⇒ you will see the playlist items. To change the number of repetitions or pause value or do other editing functions ⇒ Tap EDIT ⇒ you can now do the following customization:
Tap “Pause” to change value of the pause between each repetition;
Tap “Repetitions” to change the number of extra times each item “to be learned” is voiced
Tap “Breakdown” to learn vocabulary words for “Conversations ..” and “Sentences with vocabulary breakdown” playlists.
Tap and toggle Native On/Off to hear or not hear the “known” content. The “To be learnt content” is heard multiple times depending on the repetition number choice.
Tap “Switch” to switch the order of the first and second language item. The first (known content) is heard once and the second (to be learnt content) is heard as many times depending on the repetition number choice.
Tap and toggle “Loop Off/On” if you want to hear the playlist after it has been played completely (On choice).
In the Free playlists you cannot add any new content or permanently remove any included item. You can temporarily remove an item by
Tap “Edit” (this button is seen as “Done” and tap any item you wish to remove (the text will gray out).
How do I Prepare and Customize a Playlist? The Paid subscription to the Encore!!! Language Learning app
You can “UPGRADE” the free app to a paid version. In this version you will have full access to all the features of the app. You can make playlists from the entire distributed library and ad new content through the My Entries feature. Let us see how a playlist is made in the paid version.
A prepared set of fixed content Playlists called “Lesson Plans” are available and if you tap any of these lessons you will be taken to a Playlist screen. If you tap “Edit” (the button will convert to “Done” and you can change the number of repetitions, the amount of pause, if you want the known language to play or not. You can also tap an entry in the playlist if you don’t want it to be included in the playlist. Tap “Done” (the button will change to “Edit”) and you are ready to play the playlist.
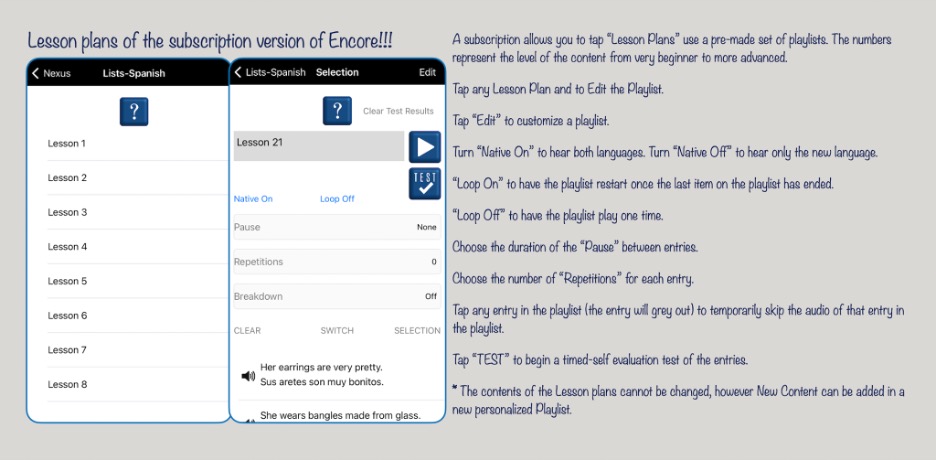
Figure 5: The paid version of the app comes with a series of Lesson Plans which are playlists that have been prepared based on the distributed library that comes with the app. The user can use these playlists to learn new language material. The user can customize the playlist parameters to use the “listen-speak-repeat” approach followed by the self-evaluated “Test”.
To make your own playlist you follow this procedure:
On the app homepage:
Tap “START” ⇒ tap “Playlists” ⇒ tap “New Playlist” you will be in a “Selection” screen. Here you can name your playlist and as described above choose the number of repetitions and pause. You can use “Native On/Off” to use a “bilingual approach” or “monolingual approach”. You can choose “Loop Off/On” to decide if you wish the playlist to stop playing or continue playing after the last playlist element of the playlist has played.
By tapping “Selection” you can go to the app’s Library content as well as any content you have in your own added “My Entries” content. You can choose what to include in the playlist. To include items you can tap each item one by one or you can use the “Range On” feature which allows you to choose items within a range between the “first tap” and the “ending tap”. You can use this feature of “Range” selection to select several regions of items to include in your playlist.
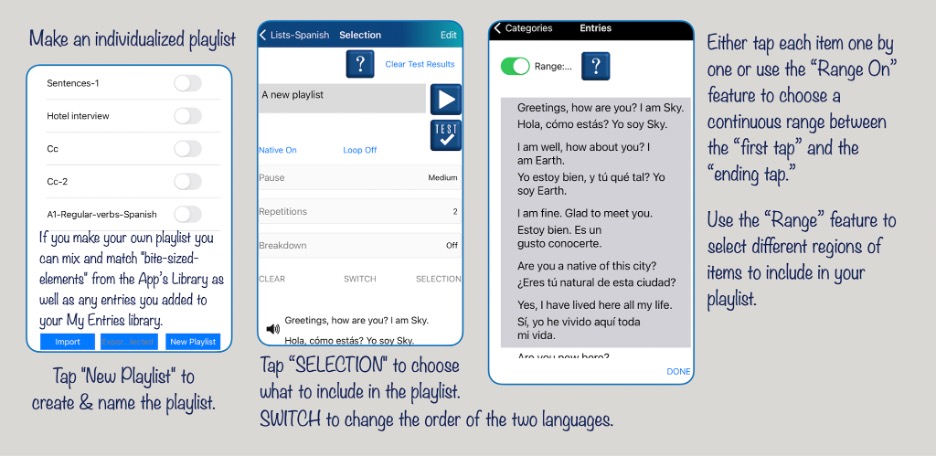
Figure 6: The user of the paid subscription of the app can make playlists using their own needs from the distributed library as well as from anything that has been added by the user to the “My Entries” section.
Encore!!! Language Learning app uses a default two language model where a known language (we will call this language KL) is used to learn the new language (NL). If you make a playlist using the library contents, In the default mode when one makes a playlist of a string of language elements and chooses a repetition number, say “R” one can listen to the KL entry once and the NL entry R times. Once can also use s pause time between repetitions so one can mimic the new word or phrase. This is the “listen-speak-repeat” mode that Encore!!! Language Learning gives the user the choice of how many times one wants to repeat and with how much pause.
For both the free and paid version of the app a user can play a playlist in the following modes:
- KL -> NL repeated: hear KL entry once and NL language multiple times. This choice is represented by Figure 1, a screenshot of a playlist made to learn French adverbs (i.e. English is a known language, KL, and French is the new language, NL. The pause time chosen is long and the extra repetition number is 8 (so a French entry will be said nine times). Both these parameters can be altered as desired by the user.
- KL (OFF) -> NL repeated: KL is not heard but can be seen on the screen and NL is repeated multiple times. This configuration is presented by the Figure 2, a screenshot of the app with “Native OFF” choice.
- NL->KL: hear NL once and choose to hear KL once. This is the situation when the user taps the “switch” button so the language order is switched. Figure 3 is a screenshot of this choice. The user will hear the French entry first and the English entry multiple times or only once if the repetition number is chosen as 0.
- NL(OFF) -> KL: NL is silent (but can be seen on the screen and KL can be chosen to be heard once. Figure 4 represents this choice where the “native OFF” means the first entry, French, will not be heard but the second entry, English, will be heard.
Use Your Playlist: Tap Play and Go! Start Learning
After the customization of a playlist you can start playing the playlist. If you see the “Done” button, tap it and it will change to “Edit”) and then tap the “▶️” button. Use the Encore!!! Method to learn: “Listen-Speak-Repeat”. The features described here are unique to Encore!!! Language Learning and provide a user dozens of opportunities to practice listening, speaking and recalling new elements of a language.
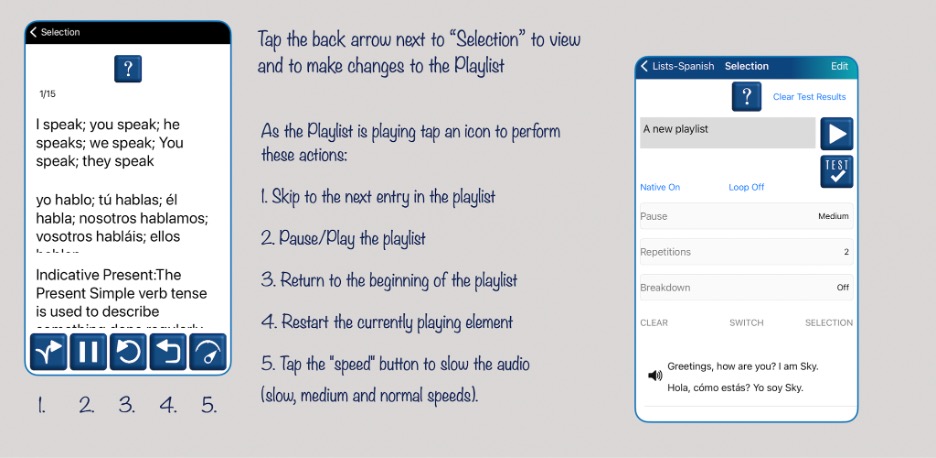
Figure 7: Once you have made a playlist and chosen the custom parameters, you can play the playlist. While the playlist is playing you can modify the playlist play experience as shown in this figure. If you wish you can look at the screen as the playlist plays, although you don’t need to interact with the mobile device and simply listen and use the playlist while doing other activities such as cooking, exercising, etc.
When one starts a playlist by tapping the “Play” button on the app the user can go about doing other activities while listening and learning – one can do a workout in the gym, a walk in a park, or do some cooking or cleaning etc. Once you prepare a playlist and examone the text content, the playlist allows you to learn without dedicating all of your time to paying attention to the mobile device.
A user can use these functions to listen and speak a new language element dozens of times with either the dual language mode or the single language mode. Once one feels they have memorized a list of new words or phrases one can use the “Test” function to take a self-evaluation test.
Use Your Playlist: Learn and then Self-Evaluate: Take a Test!
There are two additional modes in Encore!!! Language Learning that can be used when the “Test” button is tapped:
1) KL is heard once and the user comes up with the equivalent term in the new language and when “REVEAL” is tapped one hears and sees the answer. The user taps the symbol for correct or incorrect and the next entry in KL is presented. Thus a user can use the Test mode to check how well they are learning a language. In the “Test” mode the entries are presented randomly as sometimes it becomes easy to memorize a set of words if they appear in the same sequence. Figures 8 and 9 show the TEST mode where one follows this procedure.
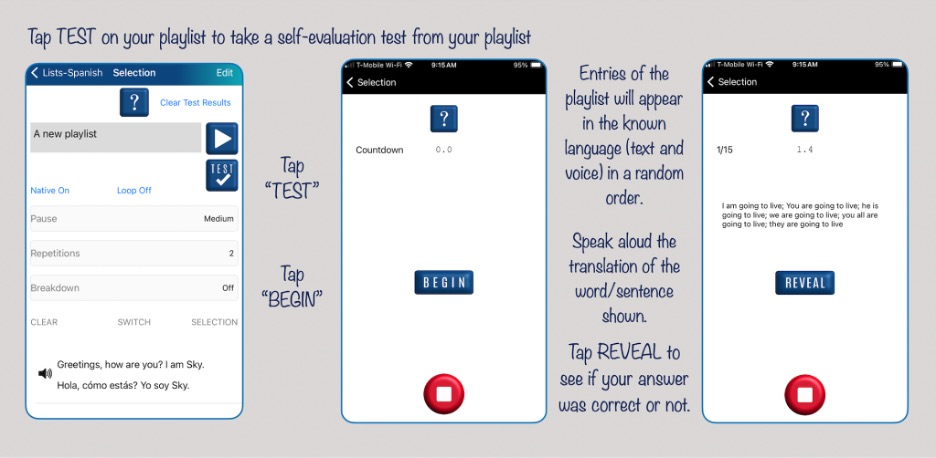
Figure 8: By tapping “TEST” a user can do a self-evaluation test. The user taps “BEGIN” after tapping “TEST” and an entry of the playlist is played in the known language. The user voices the corresponding “to be learnt language” entry and then taps “REVEAL” to check if the answer was correct.
Once the Test is complete the entries in the playlist that a user has marked as incorrect appear in a distinct color on the screen.
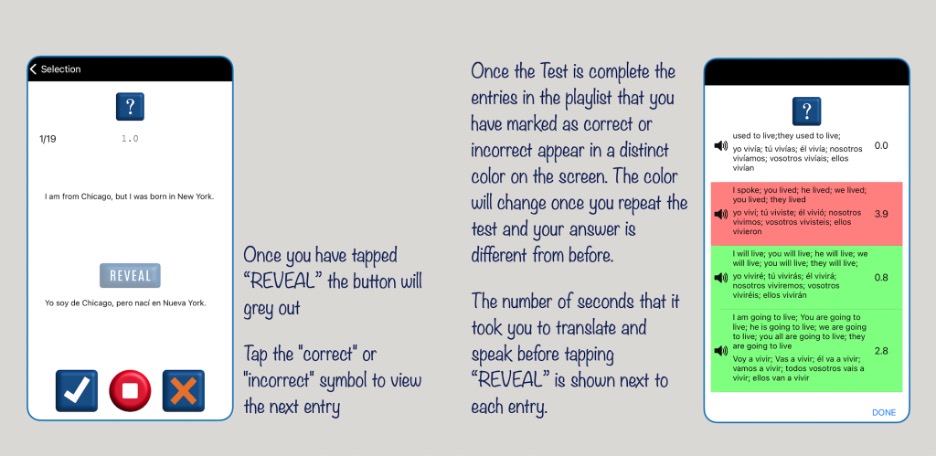
Figure 9: The “TEST” is based on self-evaluation. You decide if your “answer” is correct or incorrect and tap the appropriate button. The app then tracks your evaluation and the outcome appears in the playlist you use to take the test.
This is shown in Figures 8 and 9. By using the Edit function a user can omit playing the correct entries by tapping those entries in the playlist. The user will only practice the entries that were incorrect so those are reinforced. This allows the user to reinforce what has not been learnt and then retake the test. This process can be continued till one feels confident that the material has been learnt.
2) If the “switch” function is tapped the “test” is given in the reverse order i.e. NL is heard once and the user comes up with the equivalent term in the known language and when “REVEAL” is tapped hears and sees the answer. The user then checks the correct or incorrect symbol and the next entry in NL is presented. In the “Test” mode the entries are presented randomly as sometimes it becomes easy to memorize a set of words if they appear in the same sequence.
Adding to the Language Library : Custom Content Using MyEntry Feature
The library in the app can be expanded very easily. You can add new content yourself using content you find through textbooks, classroom content, internet resources, artificial intelligence resources, etc. You can also add content developed by teachers or language experts who may share their content with you using the “Import” feature of the app. Later in this manual we describe how content created can be shared with others. Encore!!! allows an entry to have three possible entry components. One can have an entry component that is a “known language”; and entry component that is a “translation of the known language in the “to be learnt language” and an entry that may contain a “transliteration” in case a language is not in a known script (e.g. for Arabic or Mandarin or Hindi etc.). When new entries are added to the app, as described later in this section, three textboxes are presented to the user where these three components can be added. A user need not use all three entry components and can choose among the following modes:
- Entries that have a “known language” with a “to be learnt” language as is the case for the distributed library content. This mode can be used as a bilingual language learning approach or by toggling the “Native ON” button on the playlist screen on to “Native OFF” state as a monolingual approach.
- A “to be learnt” language only where entries have only one language content. In this mode the monolingual language approach is used for learning.
- New entries can also have a “transliteration” entry component or an “explanation” entry component. The “transliteration” can help a learner read a language that has a script the learner has not mastered. An “explanation” entry can be used to explain a useful grammar point or give some other relevant information.
As mentioned above new content can be obtained from textbooks, from online translators, from artificial intelligence tools like ChatGPT, etc. Once the content has been prepared there are two methods one can use to enter the content into Encore!!! to add to one’s app-library. The added content can then be used to make playlists and learn new content through Encore!!!’s “listen-speak-repeat” and then “test” approach.
Method 1 is where you add the content directly into the Encore!!! My Entries section. This approach is suitable if you are just adding a few vocabulary words or a few sentences.
Method 2 is where you prepare the content on a desktop or a laptop and then from there copy and paste the content into the My Entries section. This approach allows you to add dozens of new entries very conveniently.
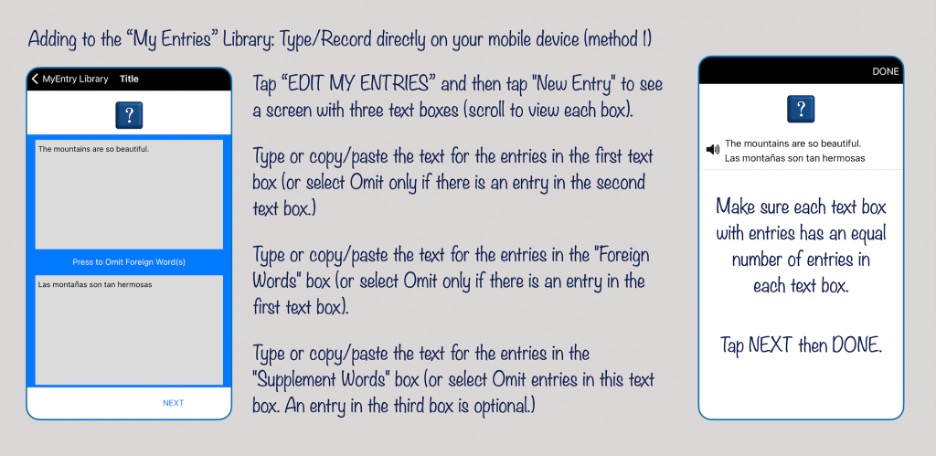
Figure 10: One can add new language content on the mobile device directly by tapping My Entries and then tapping “New Entry”. This will bring up a screen with three textboxes. Each entry in a textbox must be separated by a “return” key so the app can track the entries and match them with entries in other textboxes. Once all the entries are typed/pasted tap “NEXT” and then “DONE”.
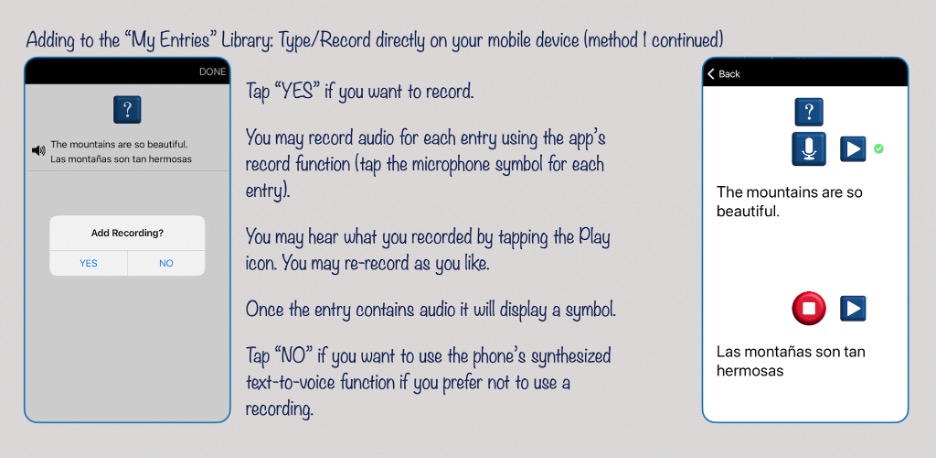
Figure 11: Once entering the text portion of new entries is finished and “NEXT” and “DONE” are tapped you will be asked if you wish to add audio to the entries or wish to use the “Text to Voice” feature of the mobile device. Remember that entries in the first textbox will be articulated as English and the second textbox will be articulated as the language you have chosen if “Text to Voice” is used. If you record your audio you can use any accent or audio.
In the Method 2 approach one creates the text content on a desktop or laptop. One can enter the content (vocabulary, sentences, verb conjugation cases, conversations related to any topic, etc.) in a Google sheet or Excel sheet. In general one can have content in three columns of a sheet: Column 1) “Known language” content; Column 2) Corresponding “New language content”; Column 3) “Transliteration or useful explanation” for the content. Note that one may decide to create content for only Column 1 (and/or Column 3) or Column 2 (and/or Column 3).
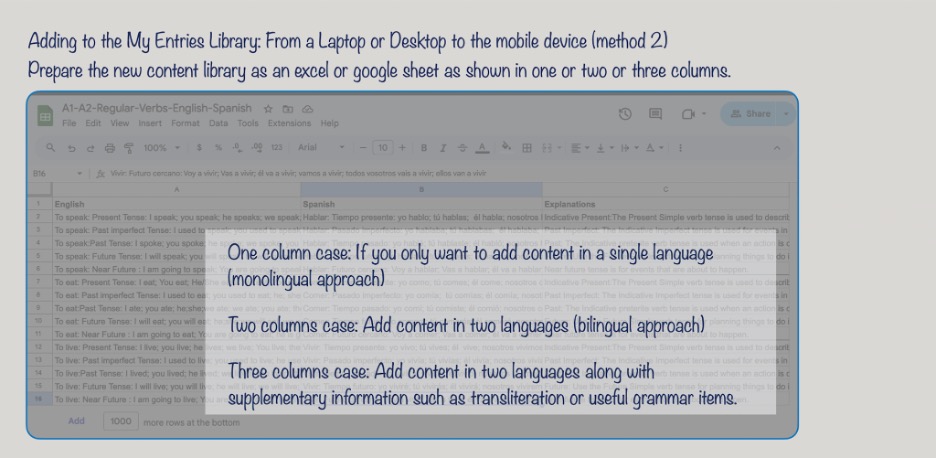
Figure 12: It is convenient to prepare the text content of new My Entries auditions on a Google sheet or Excel file on a desktop or laptop device instead of on the mobile device. As an example a Google sheet with language content in English, Spanish and explanations is shown in three columns of the sheet. Copy and email each column to your own mobile device and from there you can copy and paste the content into the My Entries section of Encore!!!.
Once the text content is available a user can add the content to Encore!!! Language app library using the following steps:
- Copy and email content of each of the sheet columns to your smartphone with Encore!!! App.
- In the app tap “EDIT MY ENTRIES” and then tap “New Entry”. This will bring you to a screen with three text boxes.
- Open your email and copy the content for the “Known Language” and paste it into the first textbox. If there is no “Known Language” content tap “No Native Content” to bring up the second text box.
- Again from your email copy the content for the second column (new language) and paste it into the second textbox.
- Finally if there is content for the “Transcription/Explanation” content add that to the third textbox.
- Tap “Next” and if the items in each text box are equal in numbers or a textbox has no content you can proceed to the next step: You will press “Done” and the app will ask you if you wish to add voice to your text. If you choose “No” the app will use the “Text to Voice” function of the phone to articulate your content.
- If you wish to add voice to the text content (you can articulate the content or record it from any audio source. You will see on the next screen a microphone image. Tap the microphone and it will go into a record mode and you can record the voice that goes with the text.
- When you are finished (you either choose “No” recording or have finished recording tap “Done” and your new content will appear in the MyEntry screen.
You can now make playlists from the entire content of the library (the distributed and your own custom content).
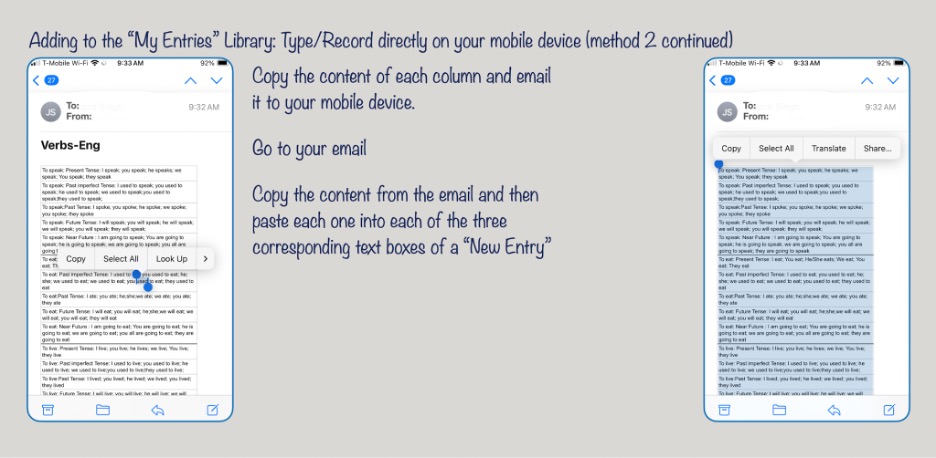
Figure 13: This figure shows the entries in a Google sheet column copied and sent via email to a mobile device. If one taps and holds on the body of the email one gets the option of select all and copy. Or you can stretch the two “handle bars” that appear to copy a portion of the content.
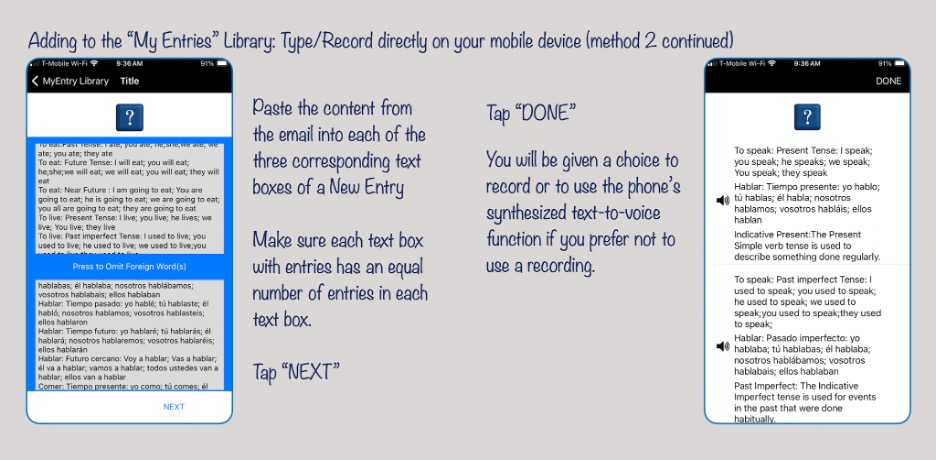
Figure 14: After copying the content of the new addition of language content from the email, launch the Encore!!! App and go to the My Entries section and tap “New Entry” as described in Figure 10. Paste the content (in our example, copy the English column content in textbox one; Spanish column content in textbox 2 and “explanations” column content in textbox three) To do this you will have to go back and forth between the email and the Encore!!! App. Note that if you feel you do not need any content for textbox three you can omit the third box.
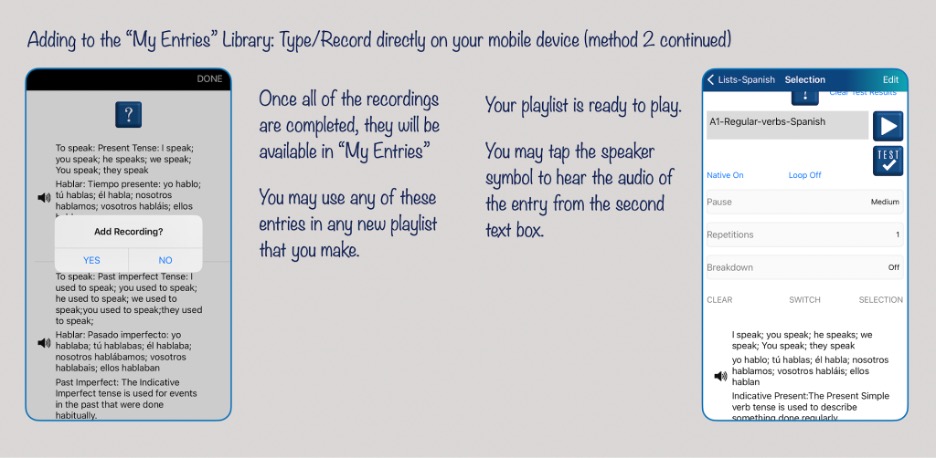
Figure 15: Once all the entries have been made, tap “NEXT” and then “DONE” and you will have the option to add voice to your entries or to use the mobile device’s “Text to Voice” feature. If you decide to record the audio you can choose “YES” and then the app will take you to the next screen where you can tap the microphone and record each entry as shown in Figure 11. Once you have finished recording your new entries will be part of the My Entries library and you can use them to make playlists and use the playlist to master the new content.
Organizing Your Custom Content: MyEntry File Management
When we examine the content in the included Library of the app, we see that the content is organized in folders, sub-folders and files. This allows users to make choices for the playlist creation in a simple manner. The MyEntry content can also be organized into folders, sub-folders etc. with the content one has created. This will allow the user to make judicious choices for the playlist to play and learn.
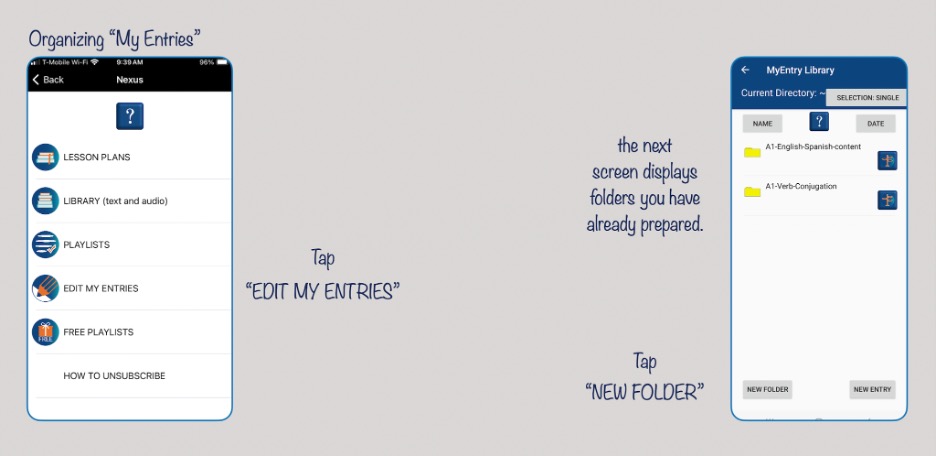
Figure 16: It is a good practice to organize the content of My Entries library into folders so one can easily find the content for use in playlists. Tap “Edit My Entries” and then tap “New Folder” to name and create a new folder where you can move My Entry content.

Figure 17: The figure shows how to create a new folder within the My Entries. There should be no space before or after the folder name. Once you create a new folder and name it you can move new entries that you have made into different folders so they can be used for later use.
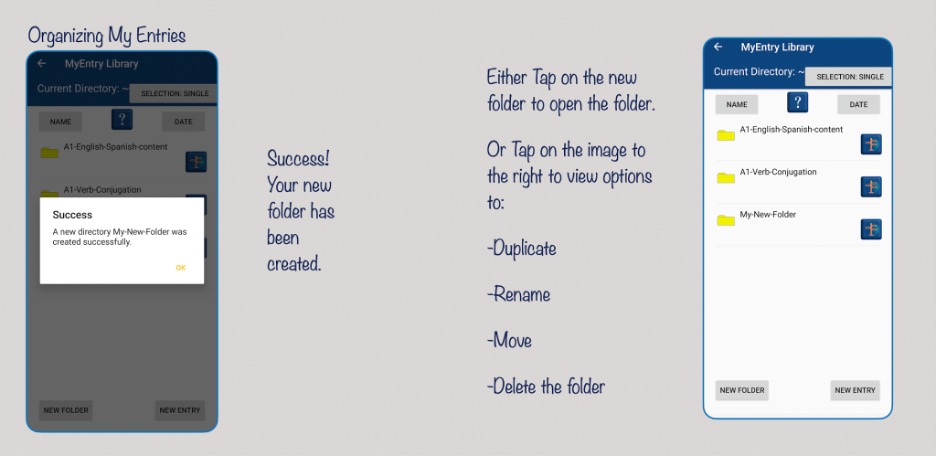
Figure 18: It is a good practice to move new entries you have added to the Encore!!! Library into a folder so you can efficiently find them and use them in making a playlist.
Sharing Content: Playlist Export and Import Functions
A language teacher or a language expert can use Encore!!! Language Learning App as a platform to develop their own custom app for languages, poetry, traditional stories etc. and share the content (Text + voice) with people who have subscribed to the app anywhere in the world. If such language enthusiasts can record the voice for the language they wish to promote or revive, they can do so in “any” language.
How do I export my content and share it with others?
The process of sharing a playlist with anyone who has the Encore!!! App (with the same language choice) is simple:
- On the Playlists screen select the playlist you wish to share by tapping on the right of the playlist. This enables the “Export” button (on the bottom of the screen). Tap “EXPORT SELECTED” and the app will create a .zip file that contains both the text and audio of the content as well as any customization you have made for the playlist(repetition number, pause, etc.).
- For the iOs devices the app will ask you to name the playlist bundle and you need to give it a name that will identify the playlist. The name does not need a .zip ending as the app will add this ending to the name you have given. Once you name the bundle and tap “Create” you will find yourself in the “Files” app of the phone and you can choose where to save the zip bundle. Navigate to the Encore!!! Language folder (this folder is automatically created by the software) and save the bundle by tapping “Done” and the playlist zip bundle will be transferred to the “Files” app within the Encore!!! Language folder. You can save the bundle anywhere in the Files app but to keep Encore!!! related files separated from your other files it is convenient to save the bundle here.
- For the Android devices once you tap “EXPORT SELECTED” you will be taken to the device”s My Files app and a .zip file called “transfer.zip” file will be created. It is important to tap “transfer.zip” and rename it to avoid confusion (since all exported files start out being called “transfer.zip”). Make sure the renamed file ends with .zip as the app will not add .zip for Android devices. Without the .zip ending the person receiving the file will not be able to use it. If the ending is missing the person receiving it can rename it and add a .zip ending.
- You can share the .zip file with anyone who has subscribed to the same language Encore!!! App directly from the “Files” or “My Files” folder. If you tap and hold the zip file you will be offered a menu from which you can choose the “Share” option and you can then share the zip file via email or via Google drive or any other sharing app.
To send a playlist content to others you export the content first to the “Files” or “My Files” app and from there share it with the person or a group of people.
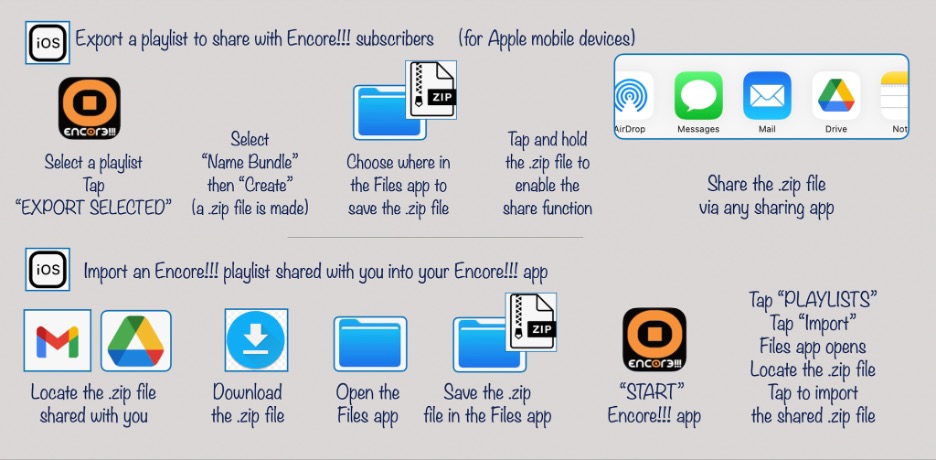
Figure 19 A schematic of the process of sharing (exporting and importing) content for iOs devices. The “Files” app on the mobile device is used as an intermediary to facilitate sharing. During the “export” of a playlist from Encore!!! a zip file is placed in the Files app and then transferred to anyone you wish to share it with. During “import” of a file the reverse occurs – you place the zip file that someone sends you into the Files app and then import it from Encore!!!.
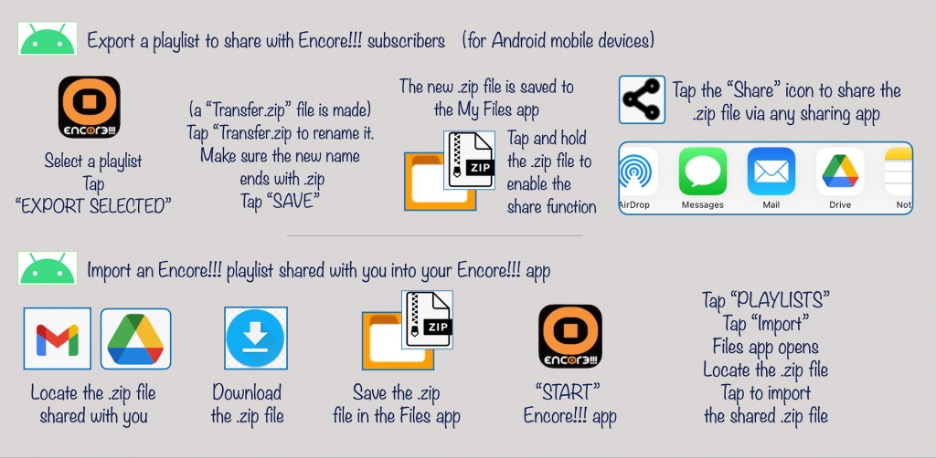
Figure 20: A schematic of the process of sharing (exporting and importing) content for Android devices. The “My Files” app on the mobile device is used as an intermediary to facilitate sharing. During the “export” of a playlist from Encore!!! a zip file is placed in the My Files app and then transferred to anyone you wish to share it with. During “import” of a file the reverse occurs – you place the zip file that someone sends you into the My Files app and then import it from Encore!!!.
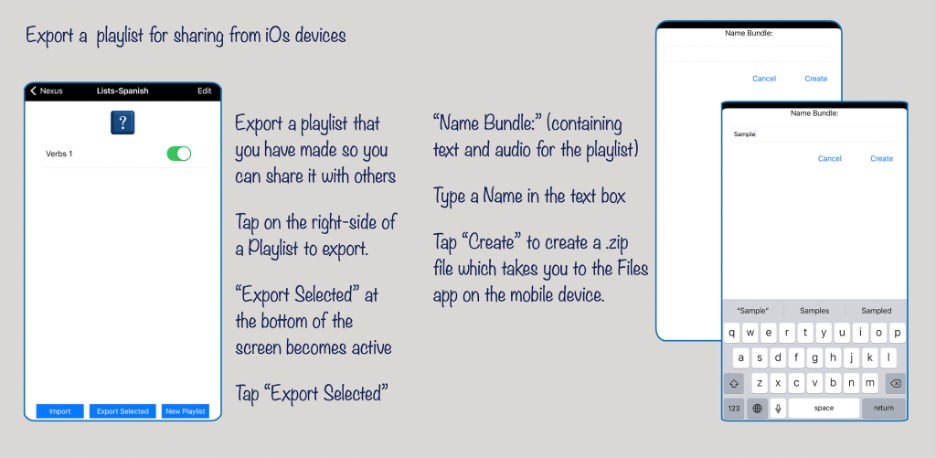
Figure 21: For iOs devices: On the Playlists screen select the playlist you wish to share by tapping on the right of the playlist. This enables the “Export” button (on the bottom of the screen). Tap “EXPORT SELECTED” and the app will create a .zip file that contains both the text and audio of the content as well as any customization you have made for the playlist(repetition number, pause, etc.).
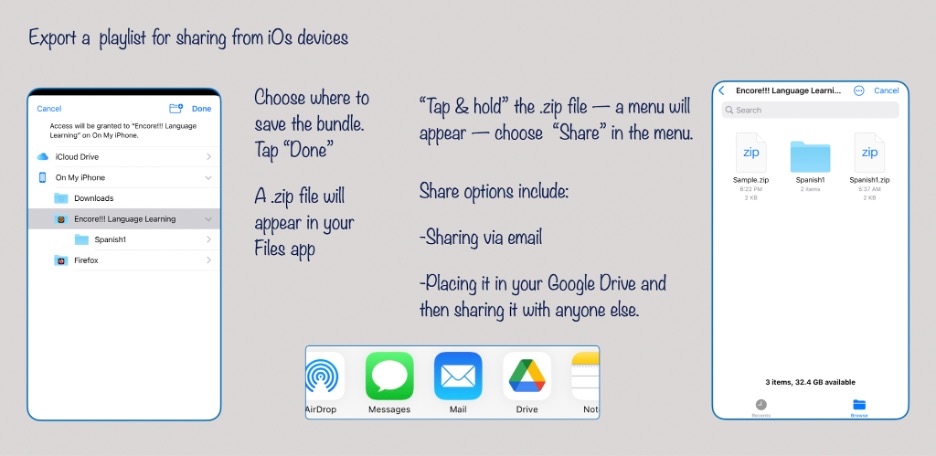
Figure 22: For the iOs devices: The Encore!!! app will ask you to name the playlist bundle and you need to give it a name that will identify the playlist. The name does not need a .zip ending as the app will add this ending to the name you have given. Once you name the bundle and tap “Create” you will find yourself in the “Files” app of the phone and you can choose where to save the zip bundle. Navigate to the Encore!!! Language folder (this folder is automatically created by the software) and save the bundle by tapping “Done” and the playlist zip bundle will be transferred to the “Files” app within the Encore!!! Language folder. You can save the bundle anywhere in the Files app but to keep Encore!!! related files separated from your other files it is convenient to save the bundle here. You can share the .zip file with anyone who has subscribed to the same language Encore!!! App directly from the “Files” or “My Files” folder. If you tap and hold the zip file you will be offered a menu from which you can choose the “Share” option and you can then share the zip file via email or via Google drive or any other sharing app.
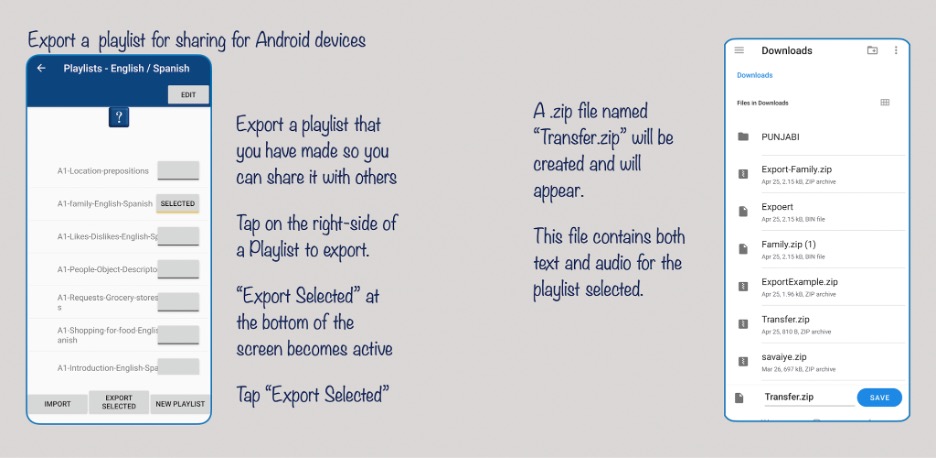
Figure 23: For Android devices: On the Playlists screen select the playlist you wish to share by tapping on the right of the playlist. This enables the “Export” button (on the bottom of the screen). Once you tap “EXPORT SELECTED” you will be taken to the device”s My Files app and a .zip file called “transfer.zip” file will be created. It is important to tap “transfer.zip” and rename it to avoid confusion (since all exported files start out being called “transfer.zip”). Make sure the renamed file ends with .zip as the app will not add .zip for Android devices.
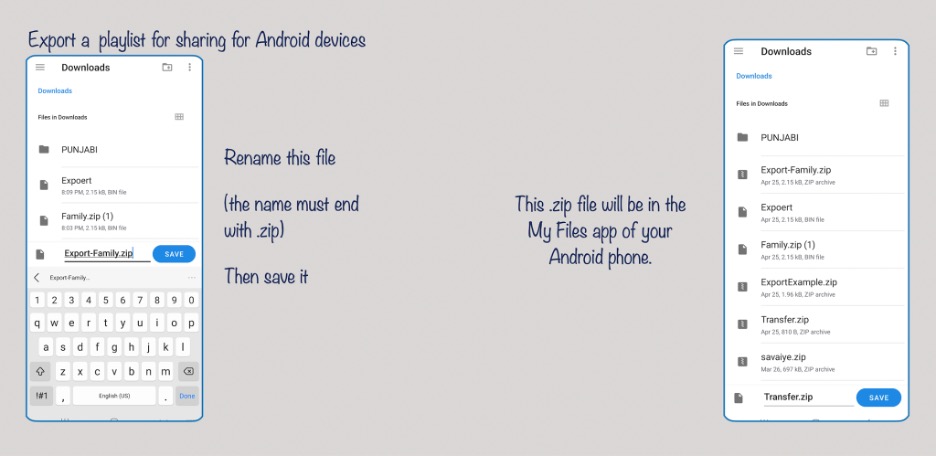
Figure 24: For Android devices: It is important to tap “transfer.zip” and rename it to avoid confusion (since all exported files start out being called “transfer.zip”). Make sure the renamed file ends with .zip as the app will not .zip for Android devices.
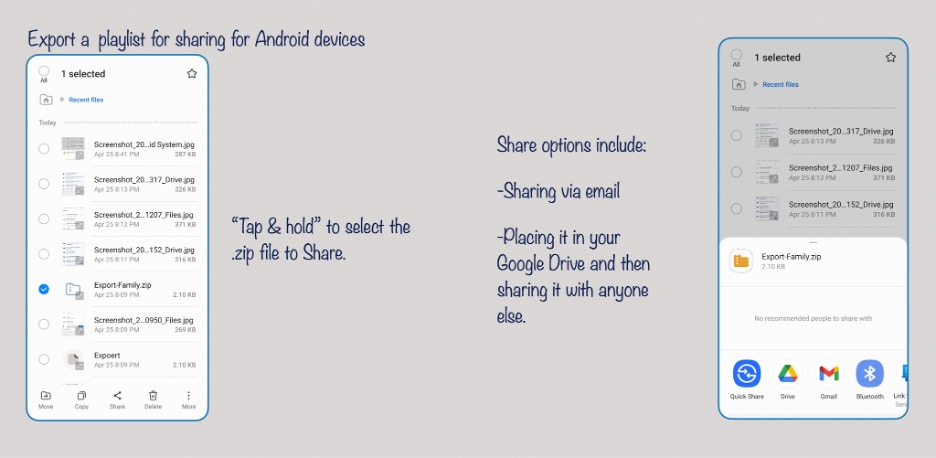
Figure 25: You can share the .zip file with anyone who has subscribed to the same language Encore!!! App directly from the “My Files” folder. If you tap and hold the zip file you will be offered a menu from which you can choose the “Share” option and you can then share the zip file via email or via Google drive or any other sharing app.
How do I Import a playlist shared with me?
You may receive a zip file containing both text and voice of a playlist that has been shared with you via email or through Google drive etc. You can only “Import” and use this content if you are subscribed to the same Encore!!! Language as the creator of the zip file has subscribed to to prepare the content. To get the content shared by someone via your email or google drive, you download the content into your “Files” or “My Files” app and from there import it into your Encore!!! App.
The details are described below and illustrated in Figures 26.
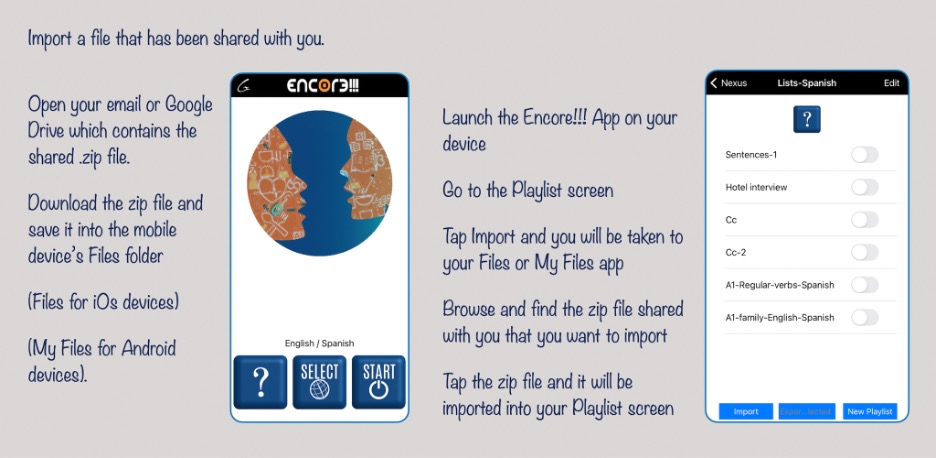
Figure 26: To import a zip file that someone has shared with you via email or through Google drive first download it into your “Files” (for iOs) or “My Files” (for Android) app. Then launch the Encore!!! app and go the playlist screen where you see the “IMPORT” button. When you tap “IMPORT” you will find yourself in the “Files” (for iOs) or “My Files” (for Android) app. Browse to find the zip file that you wish to import and tap it. The playlist within this zip file will be imported into your app. You can customize it if you wish and use it to learn the contents of the playlist shared with you.
When you receive a .zip file that someone has shared with you, the .zip file needs to be placed in your File (for iOs devices) or My Files (for Android devices) app.
- For iOs devices: If the .zip file is received as an attachment in your email: Tap and hold the attachment and then save the attachment to your File app in an iOs device. You will navigate to the folder where you wish to save the .zip file and then tap “save”.
- For Android devices: If the .zip file is received as an attachment in your email: Tap the “download” symbol and the .zip file will be in the downloads folder of the “My Files” app.
- For iOs devices: If the shared .zip file is in the google drive: Tap the three dots next to the file and a menu will appear with a variety of choices. Tap the “Download” and then choose to save the .zip file in the “Encore!!! Language Learning” folder within your “File” app.
- For Android devices: If the shared .zip file is in the google drive: Tap the three dots next to the file and a menu will appear with a variety of choices. Tap the “Download” the .zip file will be in the download folder in the “My Files” app.
- Start the Encore!!! App and go to the Playlist screen and tap “Import”. This will bring you to their phone’s “Files” or “My Files” app where you can browse to find the .zip file that has been transferred from your email or google drive.
- Tap the .zip file and it will appear on the Encore!!! Playlist screen. This playlist will have both the text and audio content as well any customization parameters chosen by the sender..
- The contents of the .zip file will also appear in their “Edit My Entries” space. It is a good practice to create a folder to move the new content into so you can find it easily when you wish to use the content later on to make new playlists.
Creating a New Language app using Encore!!! Language app
Encore!!! Language app comes with a number of languages but the choices clearly don’t cover all the languages of the world. However, the app can be used as a platform to create content for any language provided the creator can add voice to the text content. The creator can then share the content with anyone who subscribes to the same language set.
For example, let us see how an app for learning the language “XYZ” can be created so that a learner can use all the functionalities of Encore!!! Language app – ability to make playlists, play the playlists with chosen repetitions with pauses, test yourself, etc. In this section we show how one can create a language app for “Dhivehi” a language used in Maldives. This is for the sake of an example as the process can be used for any language. The process of creating a language app using Encore!!! as a platform is illustrated through Figures 27 through 37. The explanation is detailed below. Also for example, we use Spanish-English as a choice in Encore!!! to use as a platform.
- Choose any language from Encore!!! Offerings and subscribe to it (in this example we use Spanish-English). The content can be in just “Dhivehi” (monolingual learning approach) or can have English (or any other language) as a helping language for each content item (bilingual approach).
- Create the text part of the content for “Dhivehi” language as entries in an Excel file or Google Sheets. Create this content on a desktop or laptop rather than on your mobile phone for ease of creation and then bring it into the MyEntry section of the app on your mobile device. One can use the content of the “Library” in Encore!!! To get some guidance. Now you have a “library” of your ““Dhivehi”” content and you can catalog it as “Vocabulary” “theme based sentences” etc.
- Copy and email content of each of the sheet columns to your smartphone with Encore!!! App.
- In the app tap “EDIT MY ENTRIES” and then tap “New Entry”. This will bring you to a screen with three text boxes.
- Open your email and copy the content for the “Known Language” and paste it into the first textbox. If there is no “Known Language” content tap “No Native Content” to bring up the second text box.
- Again from your email copy the content for the second column (new language) and paste it into the second textbox.
- Finally if there is content for the “Transcription/Explanation” content add that to the third textbox.
- Tap “Next” and if the items in each text box are equal in numbers or a textbox has no content you can proceed to the next step: You will press “Done” and the app will ask you if you wish to add voice to your text.
- You will need to add voice to the text content (you can articulate the content or record it from any audio source). You will see on the next screen a microphone image. Tap the microphone and it will go into a record mode and you can record the voice that goes with the text.
- Now you can share your playlist content (both text and audio) with anyone who has subscribed to the same language set you started out with (in this example case “English-Spanish”).
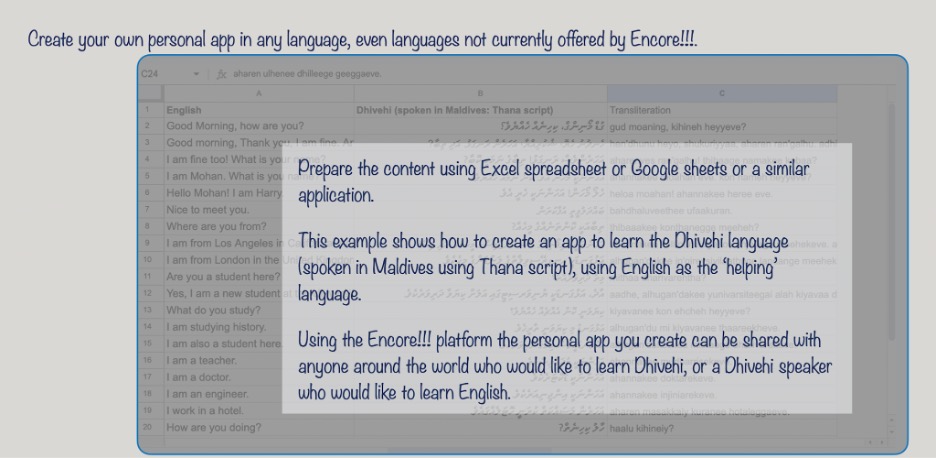
Figure 27: Create the text part of the content for “Dhivehi” language as entries in an Excel file or Google Sheets. Create this content on a desktop or laptop rather than on your mobile phone for ease of creation and then bring it into the MyEntry section of the app on your mobile device. One can use the content of the “Library” in Encore!!! To get some guidance. Now you have a “library” of your ““Dhivehi”” content and you can catalog it as “Vocabulary” “theme based sentences” etc.
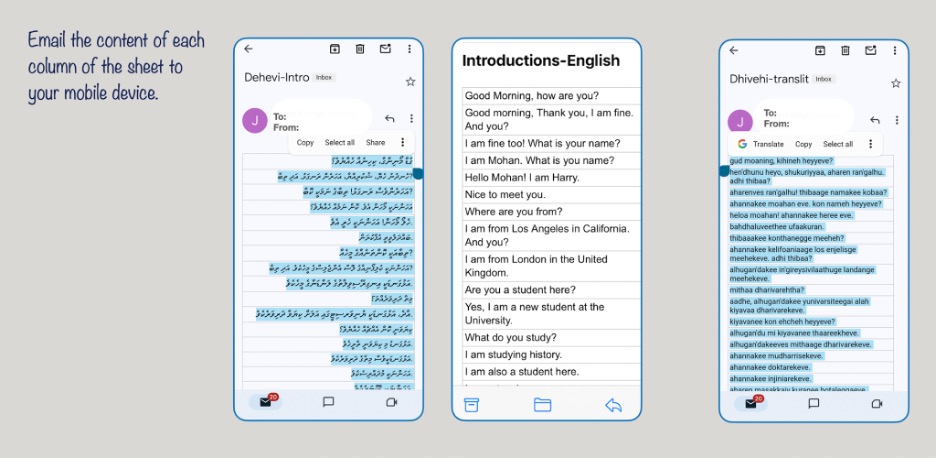
Figure 28: Copy and email content of each of the sheet columns to your mobile device which has the Encore!!! App.
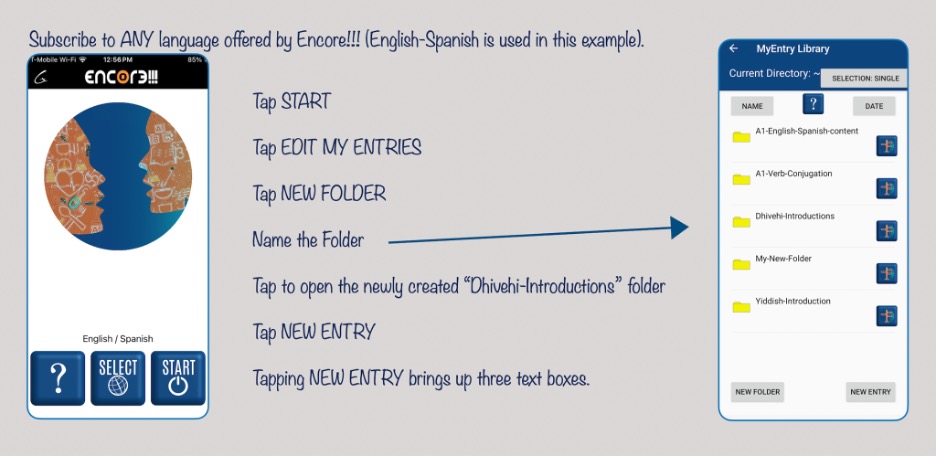
Figure 29: To keep the new language content separated from the other My Entries you may have created, make a new folder and as needed sub-folders in the My Entries space so you can place the new My Entries for Dhivehi in this folder.
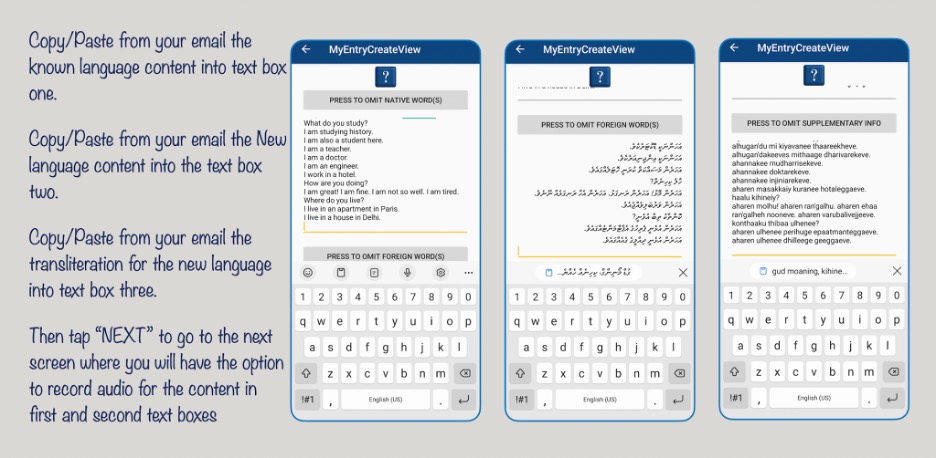
Figure 30: Open your email and copy the content for the “Known Language” and paste it into the first textbox. Again from your email copy the content for the second column (new language) and paste it into the second textbox. Finally if there is content for the “Transcription/Explanation” content add that to the third textbox.
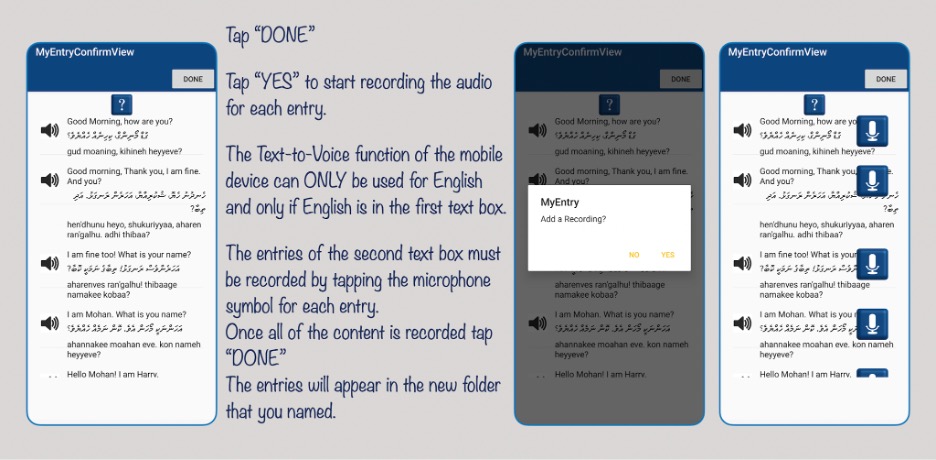
Figure 31: Tap “Next” (the number of entries in each text box have to be equal in numbers unless a textbox has zero entries) to proceed to the next step. You will press “Done” and the app will ask you if you wish to add voice to your text. Add voice to each entry. Tap the microphone and it will go into a record mode and you can record the voice that goes with the text.
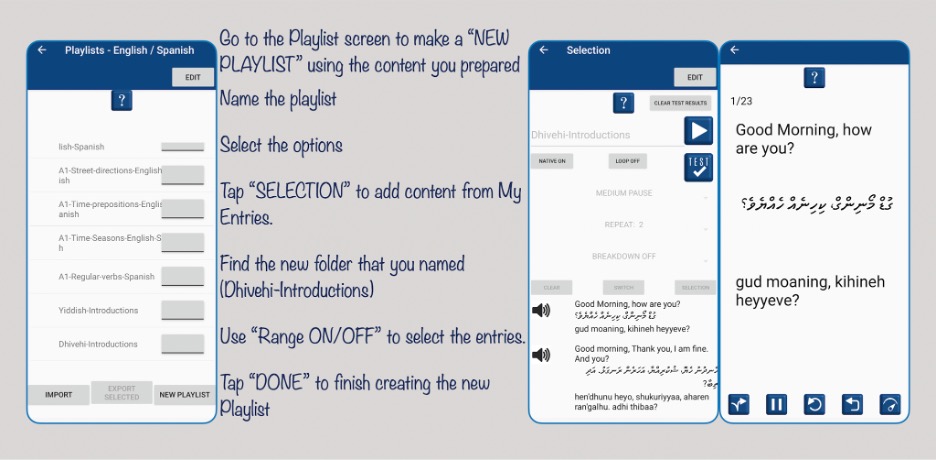
Figure 32: Make a new playlist and select elements from My Entries for the playlist you have placed in the “Dhivehi” folder. Use this playlist for learning and sharing.
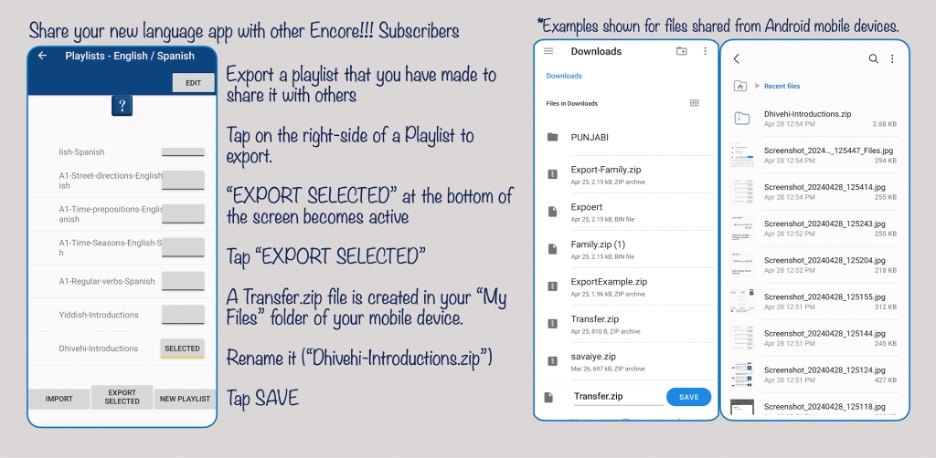
Figure 33: As described earlier on how to export a playlist, select the Dhivehi playlist and then tap “EXPORT SELECTED”. Follow the instructions given above for iOs and Android devices to place the zip file that contains both text and audio in the “Files” or “My Files” app of the mobile device.
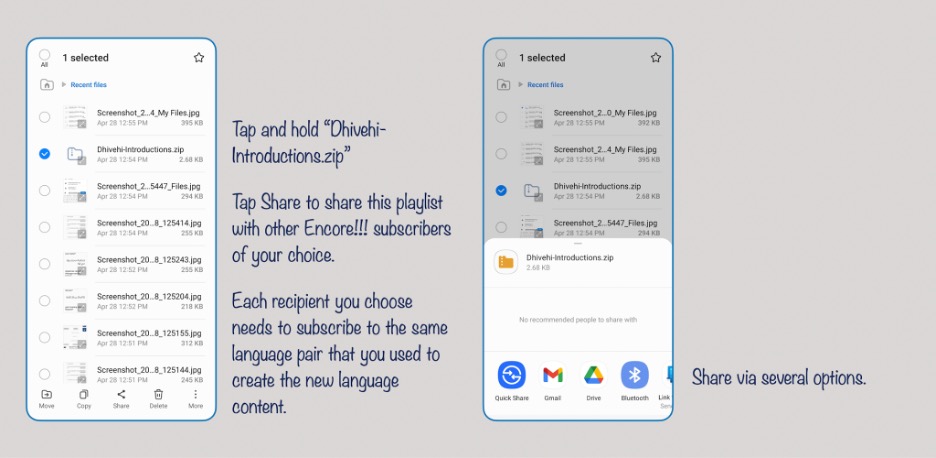
Figure 34: From you “Files” or “My Files” app tap and hold the zip file you wish to share and then share via email or through your google drive or any other sharing app.

Figure 35: A user of Encore!!! who has subscribed to the same language as the creator can import the shared zip file into Encore!!! and use it to learn new content.
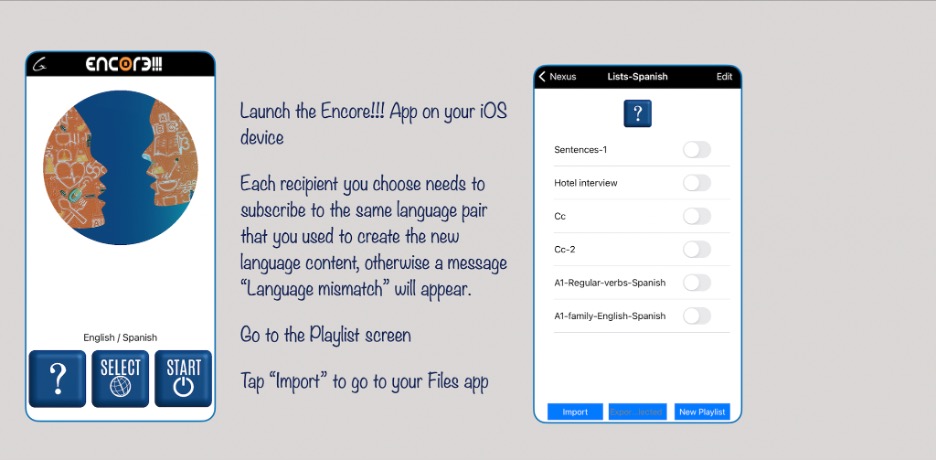
Figure 36: The receiver of a shared playlist (zip file) can start the Encore!!! App and tap “Import” which will bring the user to the file app.
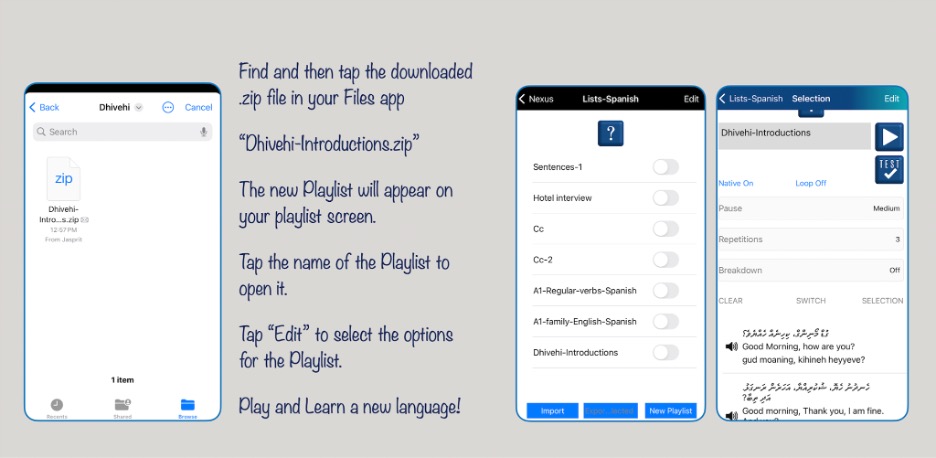
Figure 37: The user selects the zip file to import and taps on it and the playlist contained in the zip file will become part of the receiver’s content. The playlist will appear on the playlist screen and the user can customize the repetitions, pause, etc. to learn the shared content.
Encore!!! Language app to Learn Theatrical Plays, Poetry and Songs
Encore!!! Language Learning App can be used by users and teachers to learn not only languages but any piece of knowledge that requires pattern learning and memorization. Examples can be poems, prayers, theatrical plays, etc. One can even use the app to learn bird-calls, or sounds of machinery etc.
Let us take as an example a user wishing to learn a piece of poetry. The user can decide what appropriate “bite-sized” elements should be. One can choose, for example, each verse of the poetry as a “bite-sized” element. Let us say there are 40 verses so one would have 40 “bite-sized” elements. These can be entered in the MyEntry section of the app and then the user can use either the “Text to Voice” articulation or decide to record a more lyrical audio for each verse.
A playlist can then be created and the user can choose the repetition feature and “listen-speak-repeat” each verse and gradually memorize the entire poetry piece.
Note that MyEntry allows for three “texts” for each entry. The texts are for an entry in a known language, to be learnt language and transliteration/explanation text. A user can decide to only use the poetry verse in the above example (i.e entry only for the second textbox of MyEntry. If desired a user may also have for each verse a corresponding translation (for example, if the poetry is in a language other than the user’s native language) as well as a transliteration (if for example the poetry is in a non-Roman script)/ explanation.
APPENDIX
Appendix A : Best Practices for Using Encore!!! Language Learning app
To learn new words, grammar rules, sentences etc. one needs to use a new term several dozen times. This can be done with Encore!!! Language Learning app using the distributed library content or content created by yourself through MyEntry here are some best practices. In Figure 38 we illustrate these best practices.
- Step 1: Make a playlist of a dozen or less “bite-sized-elements” and choose a high repetition number (say 5) with a long pause and with the “Loop ON“ choice. Read the text of the playlist before tapping the “play” button so you are familiar with the new text. Play the playlist and hear the known language (say for example, English) once and the to be learnt language (say Spanish) 6 times (i.e. repetition number +1). During the pause try to articulate what you heard. Once the entire playlist is finished it will start playing again in the “Loop ON” selection. Once you have gone over the “Listen-speak-repeat” process for a few dozen times you can stop the play.
- Step 2: Use the same playlist with just a couple of repetition and a shorter pause time. Try to recall the new language elements quickly. You will find noticeable improvement in your recollection.
- Step 3: Choose “Native OFF” to switch off the known language (English) so you only hear the Spanish elements. Try to see if you understand these elements without the English information.
- Step 4: Tap the “Switch” button so Spanish becomes the “known language” and English becomes the “New Language”. Then choose “Native OFF” which allows you to hear only English and try to say the elements in Spanish.
- Step 5: Take the self-evaluation TEST for the playlist and review the elements you could not recall correctly.
This approach and Encore!!!’s functionality can be used to learn not just languages but also poetry verse, song lyrics, theatrical play dialogues as well as to develop any type of audio related memory (e.g. bird songs of specific birds, sounds of machinery, etc.).
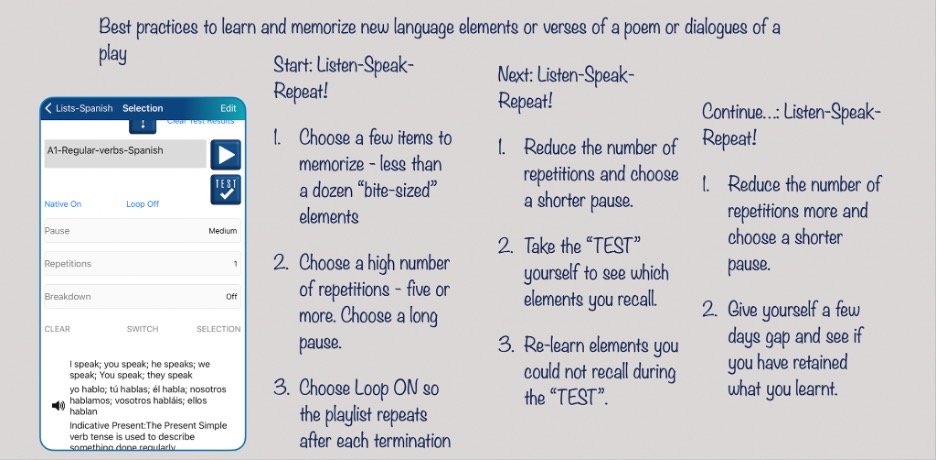
Figure 38: Suggestions for using Encore!!!’s method of “listen-Speak-Repeat” and then “TEST” to learn new content in languages, poetry, theatrical plays, etc.
Appendix B: Basic Smartphone Fluency to Exploit all the Features offered by Encore!!! Language Learning app
In order to make full use of the Encore!!! Language Learning application, a user should learn how to use some important functions on the smartphone. Make sure the phone has the file management app (Files for iOs devices and My Files for Android devices. If this app is not on your phone, download it from the app store. Also download if you don’t have a Google Drive app. Below we describe some important functions that you need to know. There are numerous excellent YouTube videos on how to copy and paste; how to download a file from Google Drive to your Files or My Files folder and how to share a file in your “Files” or “My files” app with anyone of your choosing. The following features offered on a smartphone are needed if you want to add new content to your Encore!!! App and share playlists with others. For example, a teacher can make new content and share it with students and the students then import this content into their own Encore!!! App to learn the content:
- Copy and paste ability: You may have some text that you wish to add to the library of the Encore!!! Language Learning application. This content may be in the body of a message or email etc. on your phone and may have been prepared on a desktop or laptop for convenience. It is important to learn how to copy this text (simply tap the body of the text and two handlebars will appear along with the option of “select all”. You can “pull” the handlebars apart to enclose the text you wish to copy or tap “select all” and tap the “copy” choice that will be offered. Then you can go to the Encore!!! Language Learning application and paste the text as needed.
- Understand the “File” or “My Files” app that is on your smartphone: The File or My Files app offers a storage area on your phone and offers an intermediary to share content to and from Encore!!! Language Learning application. For an iOs device you can make folders in this space into which you can transfer attachments from an email or upload files from your google drive or other storage resources. For an Android device files that are saved or downloaded from an email or google drive are placed in the download folder of “My Files” app. If these files are in the .zip file form (such a zip file contains text and voice content and is created by Encore!!! and have been shared with you by a teacher or colleague you can “import” them directly into the Encore!!! Language Learning application and use the editing functions of the app to learn and memorize the content.
If you wish to share a playlist you have made in Encore!!! Language Learning application you can transfer it through the “Export” feature in the app and place it in a folder within the “File” app. From there you can share it with others.
- Enable Recording for Encore!!! App: When you add new content to the library included with Encore!!! Language Learning you may wish to add voice to the text that is being added. For this you need to allow the phone to record voice. This can be done in the “settings” on the phone. On the settings you can find Encore!!! App and enable the “Microphone”.
- Text to Voice Choice: In Encore!!! Language Learning application very often you may decide to use text-to-voice resources to articulate the text. For example, if you use the English-Spanish app you may need to use the text to voice for Spanish. In the phone settings you have a choice of different “synthesized” voices and you can choose the one you find the most pleasing.
Appendix C: Use Artificial Intelligent Resources to Add Content to your Encore!!! App Library: ChatGPT Examples
With the availability of AI resources like ChatGPT one can ask “How will language learning be impacted? Will it become very easy to learn a new language? Will we still need 1000 to 3000 hours to learn a new language?”. It must be noted that language content creation becomes extremely easy with ChatGPT. A language lesson preparation that used to take hours will only take a few minutes thanks to ChatGPT. This will undoubtedly benefit both language teachers and language learners. It is possible that language teachers may feel that their role will diminish and their livelihoods will suffer. However, a more likely scenario is that language teachers can make classroom teaching more fun and less tedious for themselves and their students. It is also likely that more students will feel there is a possibility to learn more languages and this may increase opportunities for teachers.
We note that ChatGPT will not magically reduce the effort needed to learn a language – but it will make language learning more fun and joyful.
If you have not used ChatGPT you can Google ChatGPT and sign up for the tool. You can make all sorts of requests from ChatGPT (there are many YouTube videos showing how to do this). Note that you can get your requests as well as their translations if you wish.
Consider these commands:
- Give me 20 verbs in Japanese for a beginner language learner and use them in sentences in present tense in polite form.
- Give me 15 phrases in Japanese related to making introductions.
- Give me 10 Japanese phrases to get a taxi and direct the driver to my destination.
- Give me 25 sentences in Italian about Milan’s architecture and design highlights for an advanced Italian speaker.
- Give me 20 sentences in French along with useful vocabulary about a walking tour of Paris.
- Give me 10 phrases to express love in Italian.
- Give me 20 most useful verbs in Spanish and sentences using them in past tense.
- Give me 30 phrases needed to work in a French bakery.
You can ask about vocabulary, phrases, city tours, museum tours, city directions, history, art, festivals, etc. and ChatGPT will present them in the language of your choice. You can ask ChatGPT to provide a translation for you as well. So ChatGPT can create very interesting lesson plans for you within a minute. You are no longer limited to a language book, or content supplied by your language teacher – you can enhance the content based on your own interests. This is not only useful for a student but also for a language teacher. Within minutes a fun and interesting language lesson plan on any topic can be prepared. A teacher will know the best method to teach a language and can use ChatGPT to create content that is both fun and at the right level.
What Do I Do With The Content from ChatGPT?
In a fantasy world the content provided by ChatGPT would be directly uploaded to your brain and you would “learn” the content! Of course this cannot happen – at least not yet! The content from ChatGPT, no matter how interesting, does not give you the ability to speak or even understand a language. Just like having access to a world class gym does not give us a fit physique, content alone does not give us the ability to communicate in a new language. The content has to be used repeatedly, just like to get fitness one has to repeatedly pump iron and do cardio workouts. This is where Encore!!! Language Learning App comes to our aid.
ChatGPT Use for a subscriber to the Japanese Language in Encore!!!
ChatGPT Request:
Give me 5 sentences in Japanese for asking directions. Also give me the vocabulary used in each sentence
The app then gives the following response. (Note that a different response can be generated by clicking “Regenerate Response” on ChatGPT) :
すみません、駅はどこですか? (Sumimasen, eki wa doko desu ka?) – Excuse me, where is the train station?
Vocabulary: 駅 (eki) – station, どこ (doko) – where
すみません、あのレストランはどうやって行けますか? (Sumimasen, ano resutoran wa douyatte ikemasu ka?) – Excuse me, how can I get to that restaurant?
Vocabulary: レストラン (resutoran) – restaurant, 行く (iku) – to go, どうやって (douyatte) – how
すみません、公園は近いですか? (Sumimasen, kouen wa chikai desu ka?) – Excuse me, is the park nearby?
Vocabulary: 公園 (kouen) – park, 近い (chikai) – close/nearby
すみません、地下鉄の駅はどこですか? (Sumimasen, chikatetsu no eki wa doko desu ka?) – Excuse me, where is the subway station?
Vocabulary: 地下鉄 (chikatetsu) – subway, どこ (doko) – where
すみません、この道をまっすぐ行くとどこに着きますか? (Sumimasen, kono michi o massugu iku to doko ni tsukimasu ka?) – Excuse me, where will I arrive if I go straight on this road?
Vocabulary: 道 (michi) – road, まっすぐ (massugu) – straight, 着く (tsuku) – to arrive, どこ (doko) – where
The user now has to prepare the response for Encore MyEntry by separating the English, Japanese and Transliteration portions.
| Excuse me, where is the train station? | すみません、駅はどこですか? | Sumimasen, eki wa doko desu ka? |
| Vocabulary: station; where | 駅 ;どこ | eki; doko |
| Excuse me, how can I get to that restaurant? | すみません、あのレストランはどうやって行けますか? | Sumimasen, ano resutoran wa douyatte ikemasu ka? |
| Vocabulary: restaurant; to go ; how | レストラン ; 行く; どうやって | resutoran; iku; douyatte |
| Excuse me, is the park nearby? | すみません、公園は近いですか? | Sumimasen, kouen wa chikai desu ka? |
| Vocabulary: park; close/nearby | 公園 ; 近い | kouen); chikai |
| Excuse me, where is the subway station? | すみません、地下鉄の駅はどこですか? | Sumimasen, chikatetsu no eki wa doko desu ka? |
| Vocabulary: subway; where | 地下鉄 ; どこ | chikatetsu; doko |
| Excuse me, where will I arrive if I go straight on this road? | すみません、この道をまっすぐ行くとどこに着きますか? | Sumimasen, kono michi o massugu iku to doko ni tsukimasu ka? |
| Vocabulary:: road; straight; to arrive; where | 道 ;まっすぐ ; 着く ; どこ | michi; massugu; tsuku; doko |
We have described in this manual how to bring this content into Encore!!! Through My Entry. Follow these steps:
- Email the English; Japanese and Transliteration content separately to the phone on which Encore!!! Is available
- On Encore tap the Edit My Entry function: Three text boxes will appear when you choose “New Entry”.
- Copy and paste English content in the first text box; Japanese content into the second textbox and Transliteration into the third textbox.
- After choosing “Done” you will be presented a choice to use the Text to Voice function of the phone or record function of the phone. If you choose Text to Voice you will have the content in your MyEntry content and you can make a playlist and learn the content. If you choose to record the content with a voice (e.g. if you are a Japanese language teacher and wish to share your content with your students you can record each entry one by one.
- Now a language learner can make a playlist from the new content.. Customize the number of repetitions, pause, etc. Use the “Listen-Articulate-Repeat” method to master the new content.
